
Root method is now made available for Gionee Elife S Plus via recovery, and this can be achieved after the successful installation of Clockworkmod (CWM) recovery on your Gionee Elife S Plus device. However, installation of CWM Recovery on your Gionee Elife S Plus is no big deal, with the help of SP Flash tools; you can easily download the CWM recovery file on your device.
Before we proceed, make sure that you’ve successfully installed VCOMS driver on your computer. I already posted guide on how to install VCOM drivers here. Also download SP Flash tool here and the CWM Recovery file here.
Step 1: First download the recovery zip file from the above link, and then extract the “Recovery.img” and “MT6753_Android_Scatter.txt” file to the desktop screen of your computer or create a folder and extract to it, as seen in the image below.

Step 3: Next, download the SP Flash tool, and extract the files to your computer. You should get the following files as seen below, after extraction.
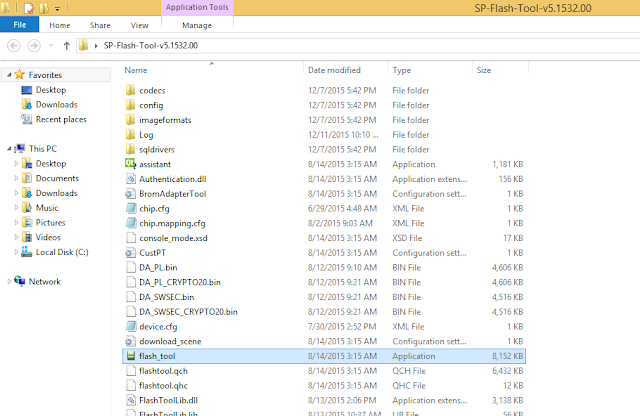
Step 4: From the extracted files, open Flash_tool.exe
Step 5: Once the flash tool is launched, then click on the download/upgrade tab and click on scatter loading button
Step 6: Now, locate the “MT6753_Android_Scatter.txt” file, which is on your desktop.

Step 7: After that, click download to begin flashing process.
Step 8: Immediately, connect your device (without battery if possible) to your computer via USB cable, and press Volume Down or up key, so it would be detected easily by your computer.
Step 9: The Flashing process would be in progress, and a Green button would appear once the process is completed.
That’s it. CWM Recovery is now installed on your Gionee Elife S Plus, to boot to recovery mode, simply press and hold Volume Down button + press Power button.
Step 2: Now, switch off your device and boot to recovery mode (press and hold Volume Down button + press Power button).
Step 3: After that, go to the recover main menu, and then choose install, and then select the SuperSU Zip file and flash immediately.
Step 4: Once the installation process is completed, simply go back main recovery menu and tap on Reboot system, and your device would be rebooted.
That’s it. Your Gionee Elife S Plus would be rooted successfully. To verify root access, simply download root checker and confirm if your device has gained root access.
Credits go to team hovatek for providing us with the CWM recovery file that is compatible for Gionee Elife S Plus, and rooting is now made possible.

Before we proceed, make sure that you’ve successfully installed VCOMS driver on your computer. I already posted guide on how to install VCOM drivers here. Also download SP Flash tool here and the CWM Recovery file here.
How to Install CWM Recovery on Gionee Elife S Plus
Step 1: First download the recovery zip file from the above link, and then extract the “Recovery.img” and “MT6753_Android_Scatter.txt” file to the desktop screen of your computer or create a folder and extract to it, as seen in the image below.

Step 2: Now, power off your device, and remove the battery if possible.
Step 3: Next, download the SP Flash tool, and extract the files to your computer. You should get the following files as seen below, after extraction.
Step 4: From the extracted files, open Flash_tool.exe
Step 5: Once the flash tool is launched, then click on the download/upgrade tab and click on scatter loading button
Step 6: Now, locate the “MT6753_Android_Scatter.txt” file, which is on your desktop.

Step 7: After that, click download to begin flashing process.
Step 8: Immediately, connect your device (without battery if possible) to your computer via USB cable, and press Volume Down or up key, so it would be detected easily by your computer.
Step 9: The Flashing process would be in progress, and a Green button would appear once the process is completed.
That’s it. CWM Recovery is now installed on your Gionee Elife S Plus, to boot to recovery mode, simply press and hold Volume Down button + press Power button.
How to Root Gionee Elife S Plus
Step 1: Firstly, download the SuperSU file from here, and move the downloaded files to the internal storage of your Gionee Elife S Plus device.
Step 2: Now, switch off your device and boot to recovery mode (press and hold Volume Down button + press Power button).
Step 3: After that, go to the recover main menu, and then choose install, and then select the SuperSU Zip file and flash immediately.
Step 4: Once the installation process is completed, simply go back main recovery menu and tap on Reboot system, and your device would be rebooted.
That’s it. Your Gionee Elife S Plus would be rooted successfully. To verify root access, simply download root checker and confirm if your device has gained root access.
Credits: Team Hovatek
CareerGiGo is an online publication created for Immigrants in search of better life abroad. It's also an >> Information hub for Immigrants, study abroad, visa guide and job offers. They focus more on helping Asians and Africans who wish to travel abroad, study and also work there.
How to Root Gionee Elife S Plus and Install CWM Recovery
4/
5
Oleh
Anyikwa chinonso
1 blogger:
not working.
Reply