
The Huawei Nexus 6P is one of Google’s latest smartphone to run on Android 6.0 Marshmallow operating system. However, the smartphone features great components and installation of TWRP Recovery, unlocking bootloader and rooting the device would improve the experience of the smartphone.

In this guide, I would walk you through the process on how to unlock bootloader of Huawei Nexus 6P, install TWRP Recovery and root.
Before you proceed, make sure that Enabled OEM unlock and USB debugging on your Huawei Nexus 6P smartphone. To enable this features, simply go to Settings >> About Phone >> and then scroll to build number and tap up to 7times, till you get a message saying you’re now a developer. After that, go back to settings >> developers option and enable OEM Unlock and USB debugging.

To start with, unlocking bootloader of Nexus 6P is the first process, in the sense that, it would open doorway to install TWRP recovery and rooting follows.
In this guide, I would walk you through the process on how to unlock bootloader of Huawei Nexus 6P, install TWRP Recovery and root.
Before you proceed, make sure that Enabled OEM unlock and USB debugging on your Huawei Nexus 6P smartphone. To enable this features, simply go to Settings >> About Phone >> and then scroll to build number and tap up to 7times, till you get a message saying you’re now a developer. After that, go back to settings >> developers option and enable OEM Unlock and USB debugging.
How to Install TWRP RFecovery on Huawei Nexus 6P
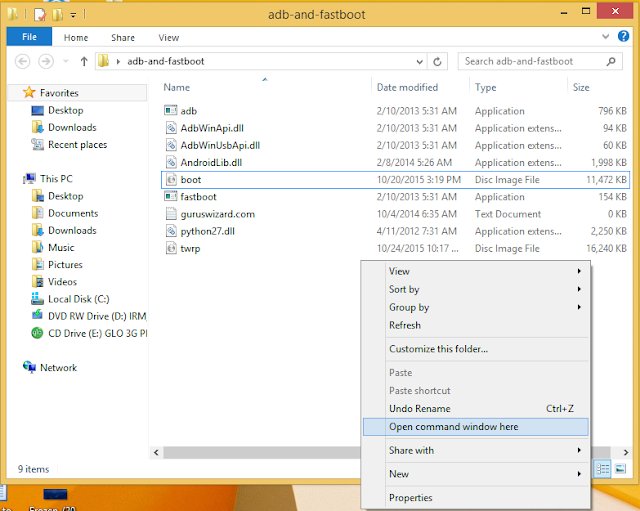
2. After that, move the image files to the ADB and fastboot folder. Also rename the TWRP Recovery image to twrp.img.

3. After that, connect your Nexus 6P smartphone to the computer via USB cable.
4. Now, open the ABD and fastboot folder, and on a blank space in the folder, press shift + right click and select “open command prompt windows” option.
5. After that, issue the below command and hit enter, to verify if your device is properly connected to the computer.
fastboot devices
6. After that, issue the below commands to flash both the boot image and twrp recovery image files.
fastboot flash boot boot.img
fastboot flash recovery twrp.img
7. The above commands would flash both files and TWRP Recovery is installed on your device.
Next is rooting your device.
How to Root Nexus 6P
1. Firstly, download SuperSU from here and move to the internal memory of your device.
2. Now, boot your Nexus 6P device to recovery mode. Simply press and hold Volume Down and Power buttons.
3. After that, from recovery menu, click on install and locate the SuperSU zipped folder you transferred to the internal memory of your device, and then install it.
4. Once you’ve successfully flashed both files, then go back to recovery menu and reboot your device.
That’s it. Your device will reboot and the root process would be completed. You can verify root by using root checker. Hope this helps? If you encounter any difficulty, feel free to let me know via comment section.
CareerGiGo is an online publication created for Immigrants in search of better life abroad. It's also an >> Information hub for Immigrants, study abroad, visa guide and job offers. They focus more on helping Asians and Africans who wish to travel abroad, study and also work there.
Related Posts
 How to check Hardware information on Android using Phone Tester
In the market today, 80% of smartphone users don’t know the hardware components on their smartphone. Some of them just
How to check Hardware information on Android using Phone Tester
In the market today, 80% of smartphone users don’t know the hardware components on their smartphone. Some of them just How to install TWRP Recovery on Nexus 4
Learn how to easily install twrp recovery on Nexus 4 smartphones.
Installation of TWRP recovery on Nexus 4 s
How to install TWRP Recovery on Nexus 4
Learn how to easily install twrp recovery on Nexus 4 smartphones.
Installation of TWRP recovery on Nexus 4 s How to Track Calls and Data usage on Android using Callistics
Every android device comes with pre-installed programs used to check call histories, check values of data usage and so
How to Track Calls and Data usage on Android using Callistics
Every android device comes with pre-installed programs used to check call histories, check values of data usage and so Best Screen Video Recorder Apps for Android – No Root Required
Screen video recording apps are softwares that are used to record your mobile screen. This entails that; whatsoever ac
Best Screen Video Recorder Apps for Android – No Root Required
Screen video recording apps are softwares that are used to record your mobile screen. This entails that; whatsoever ac How to Upload Social Display Photos without Cropping on Android
Generally, whenever we take a photo with our android device, the dimension of the photo doesn’t come in a squared shap
How to Upload Social Display Photos without Cropping on Android
Generally, whenever we take a photo with our android device, the dimension of the photo doesn’t come in a squared shap 5 Steps to Install Official Android 6.0 Marshmallow on Nexus 5, 6, 9 and Nexus 7 2013
Android 6.0 Marshmallow is now officially available for Nexus 5, Nexus 6, Nexus 9 and Nexus 7 2013, and you can easily
5 Steps to Install Official Android 6.0 Marshmallow on Nexus 5, 6, 9 and Nexus 7 2013
Android 6.0 Marshmallow is now officially available for Nexus 5, Nexus 6, Nexus 9 and Nexus 7 2013, and you can easily
How to Root Nexus 6P, Install TWRP Recovery and Unlock Bootloader
4/
5
Oleh
Anyikwa chinonso