
Innjoo Max 2 is a portable android device that features a 5.0 inches screen display, 16M color, 720 x 1280 pixels resolution, 13MP rear camera, and 8MP front snapper with dual LED flash beside the rear camera. The smartphone runs on Android 5.1.1 Lollipop out of the box, which is powered by a 1.3GHz quad-core MediaTek chipset, coupled with a 1GB RAM and a 16GB internal storage.

In this guide, I would brief you guys on how to install TWRP Recovery on Innjoo Max 2 using SP flash tools and then rooting follows.
Rooting the Innjoo Max 2 device is of great importance, as you’ll be able to run special apps like Greenify (best optimizer & battery saver app), tweak dark corners of your device and also manage RAM. However, we tried most popular root exploit like kingroot, framaroot, root genius and some other android root apps, but none avail. Thanks to team hovatek, as they managed to port TWRP Recovery for Innjoo Max 2, which makes rooting possible.
In this guide, I would brief you guys on how to install TWRP Recovery on Innjoo Max 2 using SP flash tools and then rooting follows.
Requirements:
- SP Flash tools (Download)
- VCOM drivers (Read installation guide)
- Recovery Image (Download)
- USB cable for communicating the device with your PC.
How to Install TWRP Recovery on Innjoo Max 2
Step 1: First download the recovery zip file from here, and then extract the “Recovery.img” and “MT6580_Android_Scatter.txt” file to the desktop screen of your computer or create a folder and extract to it, as seen in the image below.

Step 2: Now, power off your device, and remove the battery if possible.
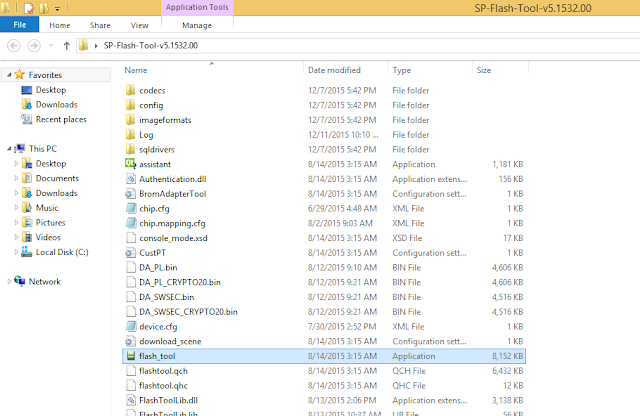
Step 3: Next, download the SP Flash tool, and extract the files to your computer. You should get the following files as seen below, after extraction.
Step 4: From the extracted files, open Flash_tool.exe
Step 5: Once the flash tool is launched, then click on the download/upgrade tab and click on scatter loading button
Step 6: Now, locate the “MT6580_Android_Scatter.txt” file, which is on your desktop.
Step 7: After that, click download to begin flashing process.
Step 8: Immediately, connect your device (without battery if possible) to your computer via USB cable, and press Volume Down or up key, so it would be detected easily by your computer.
Step 9: The Flashing process would be in progress, and a Green button would appear once the process is completed.
That’s it. TWRP Recovery is now installed on your Innjoo Max 2, to boot to recovery mode, simply press and hold Volume Down button + press Power button.
How to Root Innjoo Max 2
Step 1: Firstly, download the SuperSU file from here, and move the downloaded files to the internal storage of your Innjoo Max 2 device.
Step 2: Now, switch off your device and boot to recovery mode (press and hold Volume Down button + press Power button).
Step 3: After that, go to the recover main menu, and then choose install, and then select the SuperSU Zip file and flash immediately.
Step 4: Once the installation process is completed, simply go back main recovery menu and tap on Reboot system, and your device would be rebooted.
That’s it. Your Innjoo Max 2 would be rooted successfully. To verify root access, simply download root checker and confirm if your device has gained root access.
Credits: Team Hovatek
CareerGiGo is an online publication created for Immigrants in search of better life abroad. It's also an >> Information hub for Immigrants, study abroad, visa guide and job offers. They focus more on helping Asians and Africans who wish to travel abroad, study and also work there.
Related Posts
 How to check Hardware information on Android using Phone Tester
In the market today, 80% of smartphone users don’t know the hardware components on their smartphone. Some of them just
How to check Hardware information on Android using Phone Tester
In the market today, 80% of smartphone users don’t know the hardware components on their smartphone. Some of them just How to Track Calls and Data usage on Android using Callistics
Every android device comes with pre-installed programs used to check call histories, check values of data usage and so
How to Track Calls and Data usage on Android using Callistics
Every android device comes with pre-installed programs used to check call histories, check values of data usage and so [TWRP Recovery] How to Root LG G5 on Android 6.0.1 Marshmallow
LG G5 smartphone has finally started receiving update to the next stage of marshmallow which is versioned as 6.0.1 mar
[TWRP Recovery] How to Root LG G5 on Android 6.0.1 Marshmallow
LG G5 smartphone has finally started receiving update to the next stage of marshmallow which is versioned as 6.0.1 mar How to Customize System font on Android using Your Handwriting
Fonts are described as type size, weight and size of a typeface. We can choose to select provided fonts on android sys
How to Customize System font on Android using Your Handwriting
Fonts are described as type size, weight and size of a typeface. We can choose to select provided fonts on android sys How to Get Google PlayStore Paid Apps for Free on Android
Android devices got some lovely apps and games, but the most sophisticated apps and games for android devices are the
How to Get Google PlayStore Paid Apps for Free on Android
Android devices got some lovely apps and games, but the most sophisticated apps and games for android devices are the  Data Usage Monitor: Best Android App to Track Accurate Stat on Data
For the past years, I’ve been making use of the default mobile network data tracker that is integrated on android syst
Data Usage Monitor: Best Android App to Track Accurate Stat on Data
For the past years, I’ve been making use of the default mobile network data tracker that is integrated on android syst
How to Root Innjoo Max 2 and Install TWRP Recovery
4/
5
Oleh
Anyikwa chinonso
1 blogger:
there isn't the install part after going to recovery mode . only
Replyautomatic test
manual test
debug test version reboot
clear eMMC